Practice Mind and Skill Sets Shape Classroom Culture
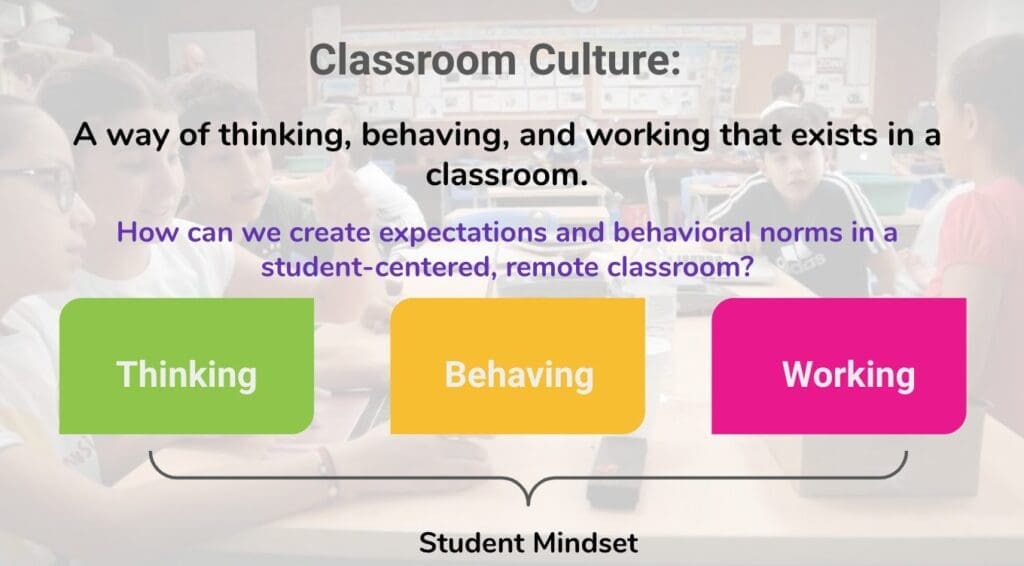
What is a Learner-Centered Classroom Culture?
Practice mind and skill sets shape classroom culture by teachers involving students in what it means to belong to the group, how they act as a group, and how they adjust their behaviors when they are not meeting their goals as a group.
A goal for learners is teachers’ top priority. Learners need to attend to issues in front, i.e. stay on task. This way, students are more likely to understand and develop strategies.
Zima cites Ken Robinson (2010), an author, speaker, and international advisor on creativity in education, offered a metaphor that captures the role of classroom culture in a learner’s development of agency:
“A great Gardner, a great farmer, depends upon plants growing under their care —- but —- you cannot make a plant grow. You don’t stick the roots on, paint the petals and attach the leaves. The plant grows itself. What you do is provide the conditions for growth. And great farmers know what the conditions are, and bad ones don’t. Great teachers know what the conditions of growth are, and bad ones don’t.”
Question to Ponder
How can I use my classroom culture to give learners opportunities to practice the mind and skill sets of agency?
Why is Learner-Centered Classroom Culture Important?
One reason learner-centered classroom culture is important is that students need voice and choice in the classroom to develop agency. Zima emphasizes that educators cannot create student agency directly. They can only create conditions for students to develop their own sense of agency. How do educators create these conditions? According to Zima, teachers should include students in conversations about how the classroom should function to promote social and academic learning. Zima gives examples of what it looks like in elementary school and secondary school:
“In early elementary school, this could include reading a book to the class and discussing how a character’s behavior made others feel. In secondary grades, teachers can simply ask the question, “What makes a learning environment effective?” Asking for student input engenders a culture of collaboration. The learners feel included in deciding how the adult will manage their day of learning.” The results of these conversations also clarify the learners’ prosocial behavior choices.
Zima explains, giving students clear expectations and tools for comparing their current behavior choices against the desired state, and setting goals to improve their behavior, leads to a robust learner-centered classroom. This way, students have the tools to help them control their behavior and be given the chance to weigh in before being asked to buy into the classroom operations. Learners need to believe they have the skills to overcome obstacles in their paths and create the future selves they desire.
Another way to give students voice and choice is to let students share their thoughts on classroom culture. Zima Cites, “allows them to contribute an opinion that matters to the group”. “They feel they belong. Furthermore, a learner-centered classroom is important because there is a connection between environments and learning opportunities that help students develop agency and the tenets of social and emotional learning.” Zima further explains, “A learner-centered classroom builds a student’s social and emotional skills by fostering a positive learning environment characterized by caring, trusting relationships (Yang, 2018)”
Another important point Zima made is when he cites “Learner-centered classroom approaches also demonstrate that self-awareness and self-confidence motivate students to try harder, and that improved motivation, goal setting, stress management, organizational skills, and problem solving enable them to overcome obstacles to improve their performance (Yang, 2018).”
So, when educators create these conditions in schools and classrooms, they address the whole-child, according to Zima.
Zima (2021) emphasizes that “the primary goal of education is not teaching; it is learning”. Zima writes, “Creating the proper conditions for learning, in part, requires the teacher to drift in and out of being at the center of attention, but never remove himself or herself entirely from the equation. Instead, learning should stay at the center, and everything that happens within a classroom, including the actions of the teacher, should revolve around it.” (p. 18-19)
Strategies that Foster Student Agency

Zima believes educators need to use strategies that place learners at the center to create an environment that fosters student agency. Zima recommends these strategies that focus on creating an environment where students feel they belong, because they have a voice in how the class runs.
- Shared vision: A statement that defines a purpose for the class
- Code of conduct: A set of expectations for how students will interact to achieve the vision
• SOPs: Guides for learners to make decisions for themselves and manage independent learning
• Monitoring tools: Tools for setting goals and measuring adherence to the code of conduct
• Parking lot: A method for capturing student voice daily
• Discussion protocols: Procedures for partner, small-group, and whole-class discussions
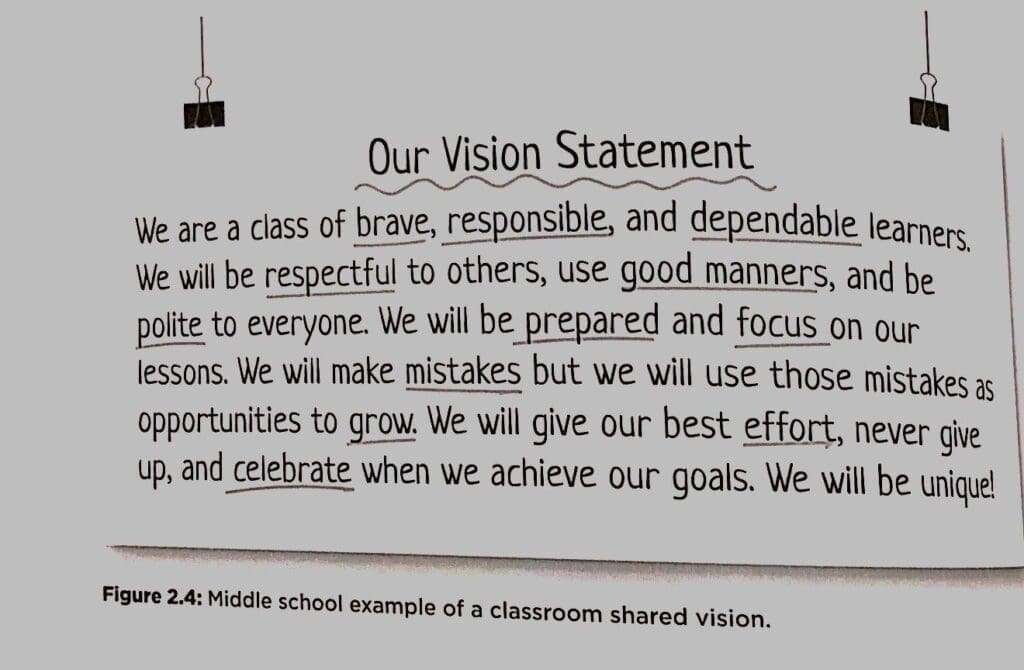
Shared Vision
A shared vision provides a collective sense of direction for learners and teachers. It has these functions:
- It answers questions: What do we want to accomplish? Why are we doing this? And how will we work together to make our vision happen?
- The shared vision statement should set lofty goals — phrases like, “focused on learning to improve our communities,” “persevere to find a solution,” and “treat all with respect to make our classroom a nicer place.” Stretch expectations for what the class can accomplish together.
- A shared vision should exist for the district, the school, and the classroom, and many stakeholders should participate in the process of creating this vision.
- Each shared vision should align with the ones at the levels above it: the classroom shared vision should connect to the school vision, which should be under the district vision.
One strategy Zima suggests you can use is that it lets students brainstorm ideas and develop a final statement by grouping and combining those ideas. This is the Affinity Diagram Process. The process is:
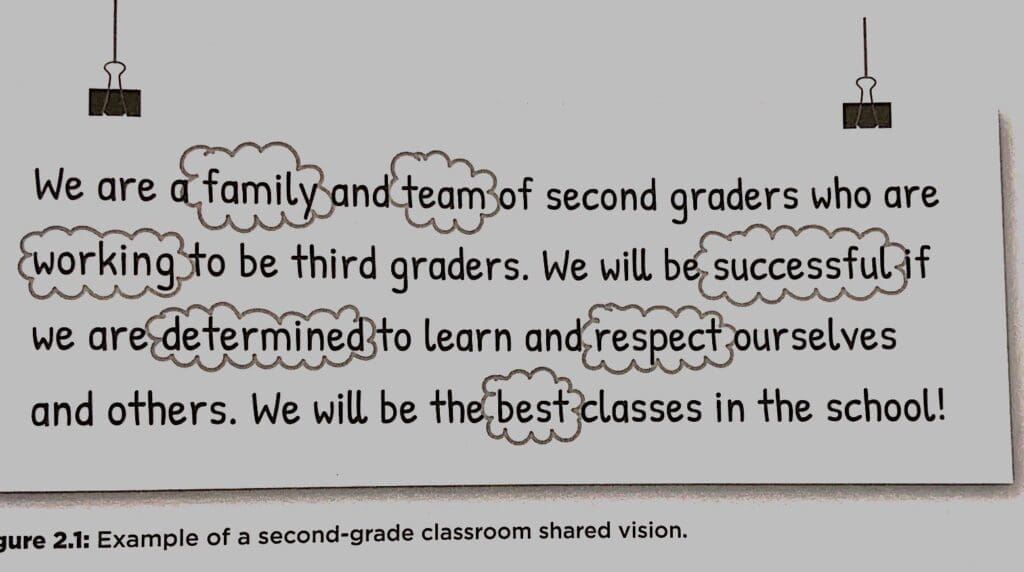
1. Write the prompt you want students to respond to. For a classroom shared vision, this prompt might be, what does a good classroom look and sound like? Or how does a successful learner behave?
2. Have students brainstorm ideas in response to the prompt, and write each one on a separate sticky note. Figure 2.3 shows examples. Students should do this step individually, without talking. For primary students unable to write, have them share ideas verbally, and record their thoughts for them. Young students might also draw pictures to answer the prompt, and then share what they drew while you capture the main points in writing.
3. Ask students to group similar comments into categories. They do this by placing their sticky notes with similar comments or ideas from other students together on the whiteboard or on chart paper. They should also do this step without talking. If working with primary students, read out the different words captured during brainstorming. A student volunteer can do the grouping according to directives received from his or her peers.
4. Have the students label the categories with a word or phrase that summarizes all the words in the group. Students can talk during this step. Students may want to move their sticky notes or tweak the wording to fit a category better, but they should not discard ideas. The goal is to narrow the categories to between three and five. A class might have more to avoid losing meaning, but the more categories there are, the wordier the vision becomes. The teacher can name the categories for primary students, depending on their skill level.
5. Once all categories are finalized and labeled, designate a smaller group of students to draft and refine a statement that includes each concept represented in the statements. Once the statement is complete, the whole class should vote to accept that single statement as the shared vision (perhaps using the acceptance vote chart, page 23). If the statement fails to receive the needed votes, the class should gather feedback on how it’s improved to gain consensus. Consensus does not mean all need to vote to agree. With secondary students, I like using a five-point scale.
1— I cannot vote for the vision, as it has serious flaws.
2— The vision has flaws, but I will trust the wisdom of the group.
3— I can live with the vision.
4— the vision represents our purpose for gathering.
5— the vision represents our purpose for gathering, and I will lead to it as a reality.
If students rate themselves a (1), they need to share what it will take to move them to at least a (2). They need not be convinced to move all the way to (5). Once the vision has been adjusted based on the feedback, another vote is taken.

Code of Conduct
A code of conduct is a set of agreed-on behaviors that will lead the class to meet its shared vision. These behaviors define how students and teachers will work together to achieve the classroom goals.
Use these steps to help students craft a code of conduct.
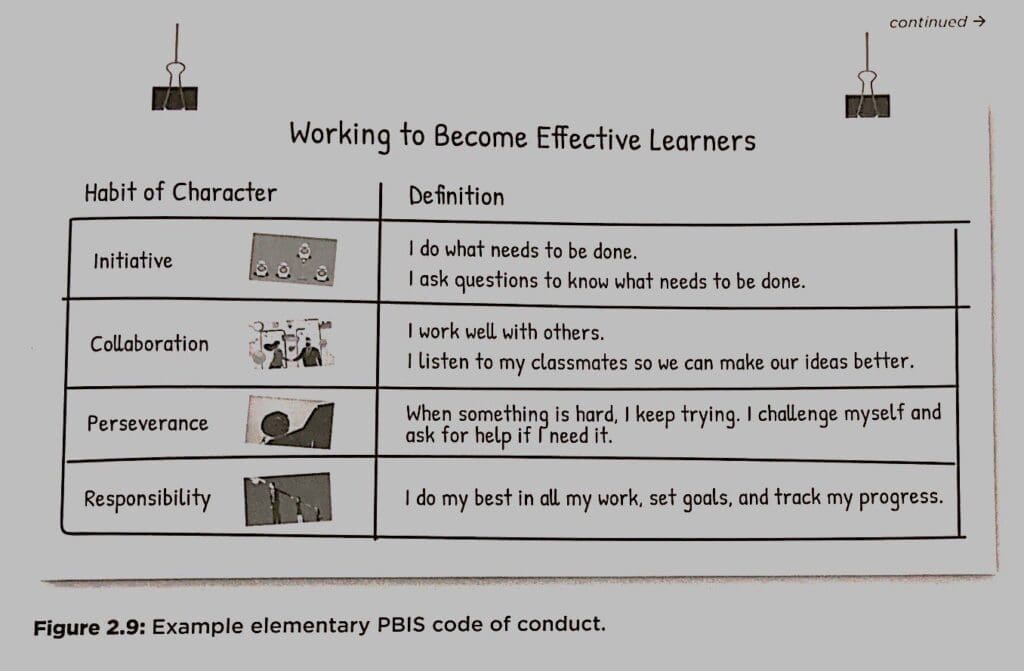
1. As a class, select key words or traits. These can be the main parts of the classroom’s shared vision. If the school has school-wide behavior expectations (as in Positive Behavioral Interventions and Supports [PBIS]), the class could use those words in its classroom code of conduct. Figure 2.9 shows a classroom code of conduct based on school-wide habits of character.
2. Have students brainstorm actions that would show visitors they are living up to expectations. For example, if focus and respect are key elements of the shared vision, students should add descriptions of behaviors that would signal meeting those traits. You can let students add as many statements or actions as possible, but I recommend three to five descriptions of behaviors for each of the main traits. The affinity diagram process described (page 20) can help narrow down the list.
3. Have students make charts or posters showing the parts and descriptions, which will hang in the classroom as a reference. Once the class compiles its code of conduct and creates a display to hang in the classroom, students should sign the code or the display or mark their vote directly on the code to signify that they accept the code as the behaviors they will use when gathered.
This process works with all grade levels. Primary grade teachers may need to use pictures instead of words to describe what correct behavior looks and sounds like. However, even middle, and high school students benefit from pictures showing desired behaviors. Once a code of conduct is in place, students can track their current state of behavior compared to the desired state. Then, helped by the teacher, they can identify strategies to improve their state of behavior and track their progress toward desired behaviors.
Zima (2021) believes a code of conduct is to give students input in the class behavior expectations they will be held to, and to set positive expectations that students can reflect on to build their sense of control over their own actions. So the class code of conduct should be phrased in positive and student-friendly language. The goal is to clearly tell students what to do—if they do not know what it means or only say what not to do, they cannot meet expectations. Educators should use the code of conduct daily to keep it alive. This is an important point that the code is not meant to be a static document that sits on the wall and is referred to only once the class is out of hand. Students need to regularly refer to it and reflect on it. (pg. 28)
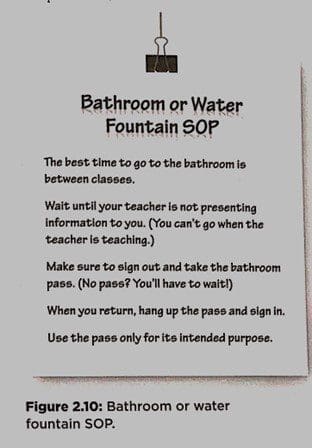
Standard Operating Procedure
Standard operating procedures, Zima cites, “are a specific set of practices that are required to be initiated and followed when specific circumstances arise” (Rao, Radhakrishnan, & Andrade, 2011, p. 1). Like in the workplace, SOPs can help learners be more autonomous, freeing the teacher from micromanaging every action to better use his or her time to support learning. When SOPs are established in the classroom by the teacher, they help students navigate independent learning at their readiness level, reducing reliance on whole-group instruction, according to Zima.
SOPs guide students through routine tasks and choices, so the teacher does not need to repeatedly give the same direction. Zima (2021) notes, “By having and using SOPs for common activities in the classroom, students start to realize they have responsibility for their learning, which can begin the shift from a culture of compliance to one of agency development.” (pg. 26)
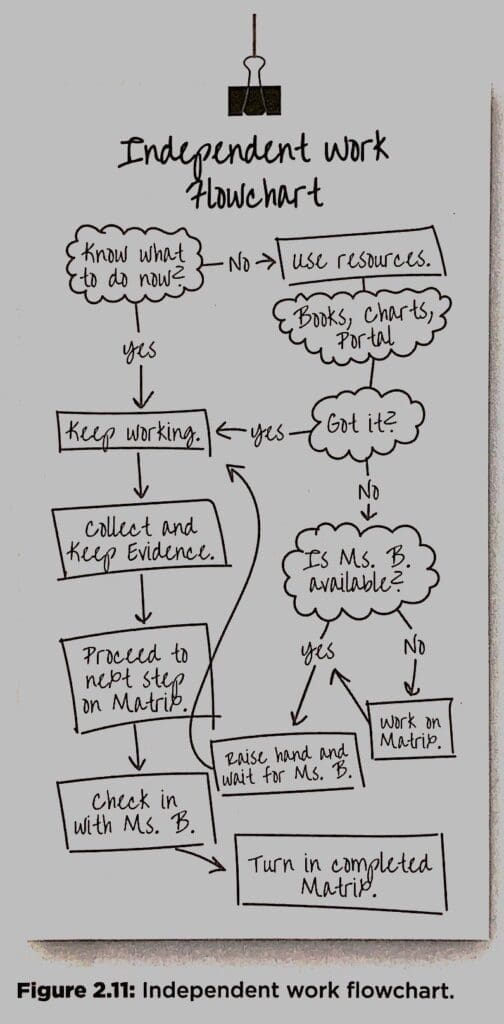
Zima describes a student perspective:
STUDENT PERSPECTIVE
[Our class has] a flowchart called “What to Do if You Are Stuck.” It lets us know what to do when stuck. I like it because it reminds us of what we can to help ourselves get unstuck, instead of waiting for the teacher to come over and tell us what to do. I used to just wait for the teacher, but she was always busy with someone else. Now, I follow this flowchart. I can use my resources [textbook, notes, internet] and see if that helps. If not, I can ask a more knowledgeable peer. That is another student who may have done this assignment, and so knows how to get around the sticky point. I can tell which students those are by what learning target they are working on. Then finally, if I am still stuck, I get one number [on a square magnet stuck to the whiteboard at the front of the classroom] and quietly read or work on something else until the teacher calls my number.
—Middle school student
Zima notes there are two types of SOPs: step-by-step lists and flowcharts.
- A list is best used when students must follow a simple sequence (for example bus routines, evacuation procedures, or lunch procedures), or when multiple solutions are unnecessary (for example, steps for washing one’s hands, or reminders of what to bring for class).
- Flowcharts are most effective when students can take multiple directions with different outcomes based on how they answer various prompts (that is, procedures for conditional decision making).
Zima recommends the following when creating SOP List:
- And appropriate, have the students create the lists in their own words. Input increases their understanding and removes “I didn’t know what it meant” as a reason for not following the procedure.
- Make sure each step is written with positive or neutral phrasing. Avoid the “thou shall not” approach to management. First, have students visualize the desired outcome of the procedure. Then have them create the steps from ending.
- A crucial final act in the creation process is to have the students run through the steps to check for accuracy and remove any ambiguous phrasing before they create a poster to hang in the classroom. For example, ask students to review what it will look like if they enter the room properly. The end result is that they should be in their seats with all the materials they need for the day. Then, ask them what actions are needed to reach that desired outcome. Have them put the steps in a logical order, practice to ensure they can be done in order, adjust the steps if needed, and then post.
Zima recommends the following for SOP Flowchart:
- To create a flowchart SOP, the class should first identify the desired final outcome. Then, the class should determine the starting point—what is the reason, or first question, that would prompt someone to need the flowchart? Then, the students should discuss possible moves from the beginning point to the desired outcome.
- Each step should be phrased as a dichotomous question, typically answered either yes or no. As students think through the options, they create branching pathways that guide users to the desired outcome. As with the procedural list, students should practice using the flowchart to ensure the steps and outcomes are correct. For example, the teacher can direct the class to think of a time when they were working on something and became stuck. Perhaps students felt they could not move forward until they got a question answered.
- The teacher can guide reflection with questions like, what did you do? What could you have done? As students brainstorm different options, they can put them into a logical order using yes-or-no questions. For example, learners might say “Ask the teacher your question.” The teacher can then respond, “Well, that is a good solution. But what if I am not available at that moment?” Students can brainstorm different answers and list what they could do. This continues until you get back to the original prompt, “What do I do if I am stuck?”
Monitoring tools
Zima believes that while it is essential to establish a culture of collaboration, it is even more critical to have strategies to keep the culture alive each day.
Zima recommends that the whole class use the documents as guidance for making appropriate behavior choices. The code of conduct clarifies the desirable behavior traits for the students, so they can use them to track their own adherence. The tracking tools help the class run even if the teacher is engaged with other learners. To help students self-monitor and learn to self-regulate their behavior, teachers should develop behavior rubrics and behavior tracking forms. These tools will both support the learners in their development of agency and let the classroom run more efficiently, making the learning more effective.
Behavior Rubrics
Behavior rubrics function:
Zima cites that a behavior rubric should show growth over a continuum (Marzano et al., 2017). It should show a progression from not meeting the behavioral goal to being an exemplar of it. This is crucial for students to track their choices and determine their progress in meeting classroom expectations. The progression or continuum of growth also scaffolds improving behavior. Teachers cannot simply expect students to jump to the proficient level of expectations. They must be ready to teach and guide students.
Zima emphasizes that it is vital that students do the work of reflection, instead of having the teacher score their performance. So the tracking system must be simple enough for students to use, without constant direction from the teacher. This will look different at different age levels and with different students. Zima recommends primary students can use pictures, either drawings or photos, to represent the desired behavior levels. Using imagery is also positive with high school and middle school students. Zima notes that when creating rubrics, include student input for the grade level and the time available. If enough time exists, have the students create the rubric. If not, make sure to at least give the students a chance to offer feedback and recommend changes to the rubric before starting it.
Zima shows a sample rubric for one part of a code of conduct—, “be safe.” This class has defined three behaviors associated with being safe: (1) keeping my hands, feet, and objects to myself; (2) moving through the classroom safely; and (3) cleaning up my area when I am finished working. For each behavior, the rubric describes a continuum of success, from needing direction from the teacher to being a role model. The rubric bears some similarity to an academic skill scale in the progression from needing help, to working on the basics but still making mistakes, to meeting expectations independently, to going beyond expectations to act as an exemplar. The rubric tries to help all students grow independently to meet expectations (level 3 in the example rubric).
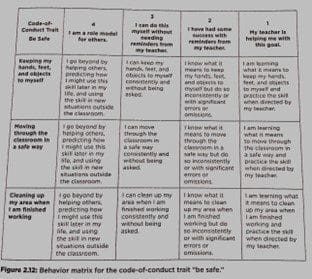
To create the rubric:
1. Choose and record the code of conduct trait in the top left box.
2. List the behaviors from the code of conduct that contribute to the overall trait.
3. Define the target performance (level 3) by recording the behavior and adding the qualifiers consistently and without being asked.
4. Define level 2 performance as understanding the behavior, but without consistently performing the skill or doing so with major errors in the strategy.
5. Define level 1 of the rubric as learning to understand the behavior with help from the teacher.
6. Define level 4 as going beyond expectations by being a role model or using the behavior in new situations.
Behavior Tracking Forms
Behavior tracking forms are a highly effective tool, because they make sure students set goals, keep track of how they are doing, analyze the data, and make informed decisions on how to improve. This helps them learn of the prosocial choices they make and what they can do to behave more consistently.
Zima recommends these steps to ensure students develop agency and not rely on teachers to tell them whether they are compliant. Zim recommends:
- A behavior tracking form should first encourage students to actively think about the behavior trait they want to work on and why it is an area of need. The statement of why they chose a particular behavior should include what evidence they have that it is an issue, and why more appropriate choices will increase their effectiveness at meeting the shared vision.
- Next, the tracking form should have an area for learners to score their own behavior throughout the week. This can be done using the behavior trait rubric created as part of the code of conduct.
- Finally, there should be an overall reflection area. I have found, for secondary students, that calculating an average score for all the days helps the learner get a sense of the week. Identifying their best day and what made that day go well also helps students grow from strength.
The tracking tool should be simple enough so students can use it independently. The form is for students to reflect on how their actions aligned with the scale in the rubric, not for the teacher. If the teacher notices students scoring themselves too high, they can have a discussion.
Zima suggests teachers to:
- Establish a routine for students to choose code-of-conduct traits to focus on, score their behavior, and reflect
- When to schedule, this is up to the teacher. This should take a week.
- At the end of the week, students reflect and determine whether they need to continue working on the same trait next week or select another.
- Students should keep the tracking form in a journal or notebook stored in their desks or somewhere else in the classroom where they have easy access.
- If students have frequent access to computers, they could use digital forms to record daily behavior scores.
- Once the teacher has shown where to store the forms and when to fill them out, the class should create an SOP that students can refer to daily to complete the form.
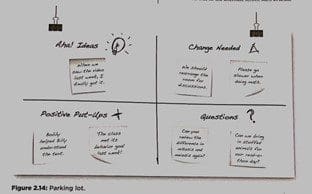
Parking lot
Parking lot is a simple piece of chart paper, divided into four quadrants where students can all post different types of feedback. The four quadrants are usually (1) questions, (2) suggestions or requests for change, (3) praise or positive feedback, and (4) ideas.
The purpose is for teachers to have a structure that lets students give ongoing input and feedback on the classroom’s general operation.
Four quadrants of Parking Lot
Questions can range from content-specific topics (Can you review the difference in mitosis and meiosis again?) to classroom operation questions (Can we bring in stuffed animals for our read-a-thon day?).
Requests for change might suggest reconfiguring the classroom, turning up the heat, or increasing time for science.
Praise can be for what someone said during a class discussion, something that deserves recognition outside of school, or for someone who volunteered to help another student.
Ideas are when a student’s insight led him or her to understand a concept or execute a strategy without error. Sharing how he or she made a connection that led to understanding can sometimes help others.
Steps for Creating a Parking Lot:
- First, divide chart paper or a section of the whiteboard into four quadrants.
- Label one quadrant questions, another changes, another positives, and the last ideas. Use alternate terms, such as deltas instead of changes or ahas instead of ideas.
- Make sticky notes and writing utensils available next to the parking lot, so students need not search for supplies before sharing their thoughts.
Important things to remember about Parking Lot:
• The teacher must address the notes left in the parking lot in a consistent and timely manner. If their thoughts stay parked (that is, ignored) for long periods, students will stop using the tool.
• If students stop posting notes in the parking lot, the teacher can add a few sticky notes and read them to the class. Once students are reminded of the tool, they typically use it again.
• The teacher must acknowledge all ideas, no matter how ridiculous. This does not mean the teacher must accept all the changes suggested in the parking lot, but the teacher needs to let students know why rejected suggestions will not work. Some teachers worry that students will flood the parking lot with joke input, but I find most students take the tool seriously if the teacher does.
STUDENT PERSPECTIVE
The parking lot is cool. You get to put your ideas on the parking lot for how things could change. I wanted the room to be different. I wrote and put it here [on the parking lot], and the teacher moved the room around. That is cool. Teachers actually do something with what we suggest.
—Elementary school student
May 9, 2016
Discussion Protocols
Discussion protocols are part of a positive culture that will encourage the development of agency within the classroom. Zima describes protocols teachers can use to give learners time for quick small-group discussions, before asking them to share in front of the class. These protocols will get the learners’ minds moving. Every student will need to say or process something. Hearing the thoughts of other learners in a safe and pressure-reduced environment can act as a catalyst for thought. Some protocols also allow quiet think time before discussion in small groups. Following the opportunity to think individually, share as a pair or group, and report to the full class, students should always receive quiet time to reflect and adjust their original answer.
Most faculty, let alone students, had not participated in a visioning process, so I remember students being immediately energized to tackle the question of who we were and what we believed. It was heartening to see so many answers with traits of the school vision—ready, respectful, responsible. It helped us to immediately build a team identity and form relationships. From there, we created SOPs to proactively teach expectations. The shared understanding and cooperation improved team and classroom cultures!
To accomplish building our classroom shared vision, we started with brainstorming the prompt and then did an affinity process. After creating one statement, we voted to accept it as our vision. To keep it alive, we used a parking lot for continual changes.
We had a learning curve. The first time we went through the process of creating a classroom vision and SOPs, we (naively) did not look at it as a team, so students were doing a classroom vision and SOPs in every class on the first day. Whoops. We learned really quickly, and by midday we had assigned different tasks to each class. All students gave input, but then we spared them having to do the same thing four times!
—Mrs. Grantham, middle school English language arts
August 3, 2020
Conclusion
TEACHER PERSPECTIVE
Most faculty, let alone students, had not participated in a visioning process, so I remember students being immediately energized to tackle the question of who we were and what we believed. It was heartening to see so many answers with traits of the school vision—ready, respectful, responsible. It helped us to immediately build a team identity and form relationships. From there, we created SOPs to proactively teach expectations. The shared understanding and cooperation improved team and classroom cultures!
To accomplish building our classroom shared vision, we started with brainstorming the prompt and then did an affinity process. After creating one statement, we voted to accept it as our vision. To keep it alive, we used a parking lot for continual changes.
We had a learning curve. The first time we went through the process of creating a classroom vision and SOPs, we (naively) did not look at it as a team, so students were doing a classroom vision and SOPs in every class on the first day. Whoops. We learned really quickly, and by midday we had assigned different tasks to each class. All students gave input, but then we spared them having to do the same thing four times!
—Mrs. Grantham, middle school English language arts
August 3, 2020